Docker Swarm下Consul多DC部署

在前一篇中完成了swarm的搭建和测试,继续使用上一个的overlay网桥。Docker集群搭建及网络互通配置

consul集群

使用前一个配置好的网卡地址prod-overlay

查看一下overlay网卡分配的网段,第一个是网段,第二个是网关

1
2
[root@bogon consul]# docker network inspect --format {{.IPAM.Config}} prod-overlay
[{10.0.0.0/24 10.0.0.1 map[]}]

直接上compose文件

1
2
3
4
5
6
7
8
9
10
11
12
13
14
15
16
17
18
19
20
21
22
23
24
25
26
27
28
29
30
31
32
33
34
35
36
37
38
39
40
41
42
43
44
45
46
47
48
49
50
51
52
53
54
55
56
57
58
59
60
61
version: '3'
networks:
# 配置此网桥名
prod-overlay:
# true表示网桥存在,false代表网桥不存在,启动容器并创建
external: true
services:
consul1:
image: consul:1.4.4
hostname: "consul1"
container_name: "dc1consul1"
ports:
- 8500:8500
networks:
# 指定overlay的网桥名
prod-overlay:
# 需要指定当前镜像的IP
ipv4_address: 10.0.0.10
# 然后在consul的命令中指定-bind ip, 因为都是内网,所以不用配置-advertise-wan
# 指定一下数据中心, 也就是现在的VM-1
command: "agent -server -bootstrap-expect 3 -ui -client 0.0.0.0 -bind 10.0.0.10 -node servernode1 -datacenter dc1"
consul2:
image: consul:1.4.4
hostname: "consul2"
container_name: "dc1consul2"
networks:
prod-overlay:
ipv4_address: 10.0.0.11
command: "agent -server -join consul1 -disable-host-node-id -client 0.0.0.0 -bind 10.0.0.11 -node servernode2 -datacenter dc1"
depends_on:
- consul1
consul3:
image: consul:1.4.4
hostname: "consul3"
container_name: "dc1consul3"
networks:
prod-overlay:
ipv4_address: 10.0.0.12
command: "agent -server -join consul1 -disable-host-node-id -client 0.0.0.0 -bind 10.0.0.12 -node servernode3 -datacenter dc1"
depends_on:
- consul1
consul4:
image: consul:1.4.4
hostname: "consul4"
container_name: "dc1consul4"
ports:
- 9500:8500
networks:
prod-overlay:
ipv4_address: 10.0.0.13
command: "agent -join consul1 -disable-host-node-id -client 0.0.0.0 -bind 10.0.0.13 -node clientnode1 -datacenter dc1"
consul5:
image: consul:1.4.4
hostname: "consul5"
container_name: "dc1consul5"
ports:
- 10500:8500
networks:
prod-overlay:
ipv4_address: 10.0.0.14
command: "agent -join consul1 -disable-host-node-id -client 0.0.0.0 -bind 10.0.0.14 -node clientnode2 -datacenter dc1"

在这里是启动了3个Server,2个Client,所有状态正常,可以映射Client端口做服务注册

VM-2上,使用相同compose文件,修改数据中心为dc2,更改所有IP就行了。

在任意数据中心的Server上,执行join就可以相互连接了。

1
2
3
4
5
6
7
8
9
10
/ # consul join -wan 10.0.0.10
Successfully joined cluster by contacting 1 nodes.
/ # consul members -wan
Node Address Status Type Build Protocol DC Segment
servernode1.dc1 10.0.0.10:8302 alive server 1.4.4 2 dc1 <all>
servernode1.dc2 10.0.0.20:8302 alive server 1.4.4 2 dc2 <all>
servernode2.dc1 10.0.0.11:8302 alive server 1.4.4 2 dc1 <all>
servernode2.dc2 10.0.0.21:8302 alive server 1.4.4 2 dc2 <all>
servernode3.dc1 10.0.0.12:8302 alive server 1.4.4 2 dc1 <all>
servernode3.dc2 10.0.0.22:8302 alive server 1.4.4 2 dc2 <all>

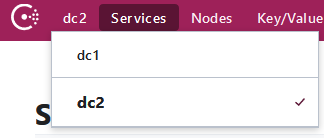
访问两个dc任意一个服务端的页面,都可以看到两个dc的信息

注:网际间gossip协议加密后期再考虑

结束!🔚


Buy Me A Coffee.