Docker集群部署Consul 1.5.x

前提:

基于esxi, 已经虚出4台Centos 7.6,三台作为Server,一台作为Client。都安装了Docker

所用环境

类型IP
docker01Server10.20.88.32
docker02Server10.20.88.33
docker03Server10.20.88.34
docker04Client10.20.88.35
本机Client10.20.61.24

docker04和本机都拿来做客户端,测试不同Agent间的调用。

编写配置文件

​ 首先需要编写一个json格式的配置文件,其实在这里直接用命令行也是可以配置的,就是太过于繁杂。都整理到一个配置文件里面。

不同环境的配置文件有所区别。配置文件具体参数可以查看:地址

  • Server端配置文件
1
2
3
4
5
6
7
8
9
10
11
12
13
14
15
16
17
18
19
20
21
22
23
{
"datacenter": "beijing",
"data_dir": "/consul/data",
"log_level": "INFO",
"bind_addr": "10.20.88.32",
"node_name": "server-node-1",
"encrypt": "O2GZwciIEl13cZxvHmVPuw==",
"server": true,
"bootstrap_expect": 3,
"client_addr": "0.0.0.0",
"retry_join": ["10.20.88.32","10.20.88.33","10.20.88.34"],
"disable_host_node_id": true,
"acl" : {
"enabled": true,
"default_policy": "deny",
"down_policy": "extend-cache",
"enable_token_persistence": true,
"tokens": {
"master": "fc2047f4-6466-42e9-bf55-f36e3217829c"
}
},
"disable_update_check": true
}
  • Client端配置文件
1
2
3
4
5
6
7
8
9
10
11
12
13
14
15
16
17
18
19
20
21
{
"datacenter": "beijing",
"data_dir": "/consul/data",
"log_level": "INFO",
"bind_addr": "10.20.61.24",
"node_name": "client-node-2",
"encrypt": "O2GZwciIEl13cZxvHmVPuw==",
"client_addr": "0.0.0.0",
"ui": true,
"retry_join": ["10.20.88.32"],
"disable_host_node_id": true,
"acl" : {
"enabled": true,
"down_policy": "extend-cache",
"enable_token_persistence": true,
"tokens": {
"master": "fc2047f4-6466-42e9-bf55-f36e3217829c"
}
},
"disable_update_check": true
}

tip1. 不同机子只需要修改IP和节点名称即可,其他项都相同

tip2. Client上有几个参数是不需要配置的,请注意

集群化部署

  1. 先在每台机子上创建一个文件夹,作为Consul容器的Volumes,用来存放数据和配置文件
1
> mkdir -p /opt/consul/config
  1. docker01~docker03上传Server的配置文件config.json, 启动consul容器
1
2
3
4
5
6
# Server 1
> docker run -d --name consul-server-1 --rm -v /opt/consul/:/consul/ --hostname consul1 --network host consul:1.5.3 consul agent -config-file=/consul/config/config.json
# Server 2
> docker run -d --name consul-server-2 --rm -v /opt/consul/:/consul/ --hostname consul2 --network host consul:1.5.3 consul agent -config-file=/consul/config/config.json
# Server 3
> docker run -d --name consul-server-3 --rm -v /opt/consul/:/consul/ --hostname consul3 --network host consul:1.5.3 consul agent -config-file=/consul/config/config.json

这里就指定配置文件地址就可以,不需要大长串的cli配置了,因为有retry_join的配置,所以启动后,会自动加入集群,不需要consul join命令再去手动操作。

  1. 启动Client
1
2
3
4
# docker04
> docker run --rm --name client-1 -v /opt/consul/:/consul/ --hostname consul4 --network host consul:1.5.3 consul agent -config-file=/consul/config/config.json
# 本机(无Docker环境)
> consul.exe agent -config-file=path\to\consul\config\config.json

至此,集群启动完成,可能查看log会报警告,暂时先不管,因为此时ACL已经生效

1
[WARN] agent: Coordinate update blocked by ACLs

配置ACL

Consul官方给了在线学习地址,有能力最好直接看官方教学,我自己实践上可能会有一些区别:地址

ps. 之前google的时候还给了配置过程的摘要,这回就找不到了。。

打开10.20.61.24:8500,选择ACL,先使用Master token登录UI, 就是配置文件里面的fc2047f4-6466-42e9-bf55-f36e3217829c
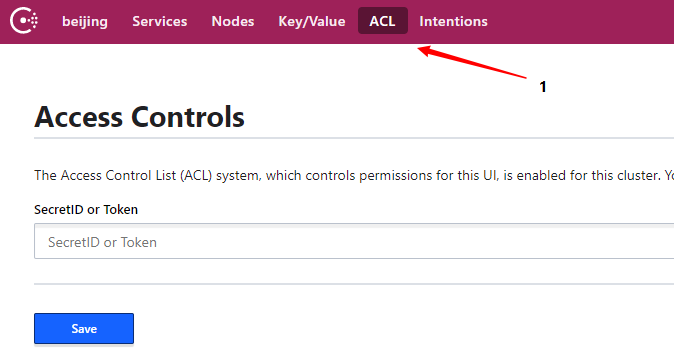
成功进入以后,可以看到三个tab,分别是tokens、roles、policies。

  1. 先创建node同步权限

创建一个新的权限,命名为agent-token,规则如下:

1
2
3
4
5
node "server-node-1" { policy = "write" }
node "server-node-2" { policy = "write" }
node "server-node-3" { policy = "write" }
node "client-node-1" { policy = "write" }
node "client-node-2" { policy = "write" }

所有节点都给写权限,也可以写成如下方式,匹配前置字符串

1
2
node_prefix "server-node" { policy = "write" }
node_prefix "client-node" { policy = "write" }

ps. 这里使用的是consul推荐的HCL格式,也可以使用json格式创建,都可以支持。

  1. 创建token

在token选项卡创建一个新的token,policies选择刚才创建的agent-token权限
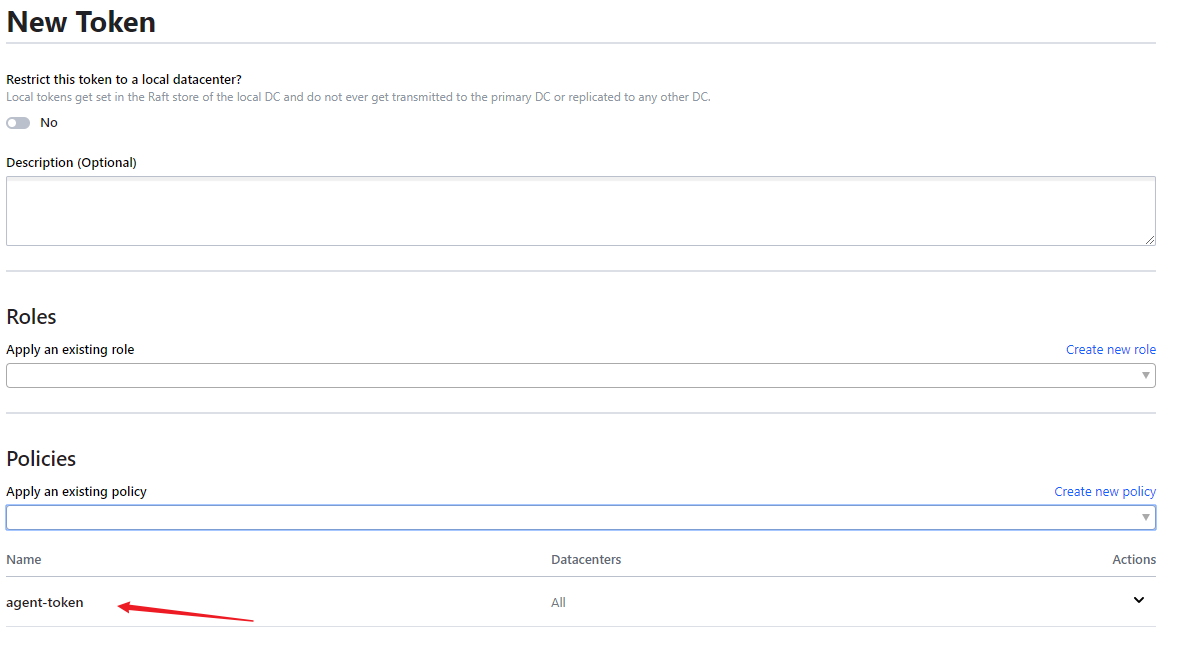
  1. 更新任意server节点的配置文件,添加重启或者reload配置

复制刚才创建的token
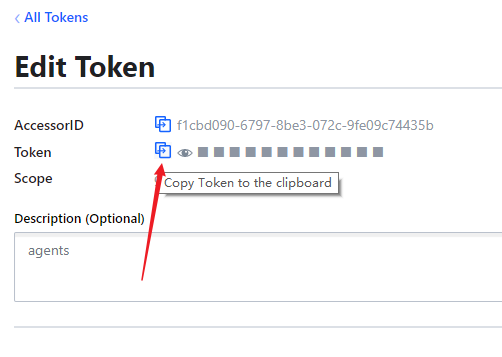
添加到配置文件里面,然后重启server,我们这里修改server-node-2的配置,然后重启服务。

1
2
3
4
5
6
7
8
9
10
"acl" : {
"enabled": true,
"default_policy": "deny",
"down_policy": "extend-cache",
"enable_token_persistence": true,
"tokens": {
"master": "fc2047f4-6466-42e9-bf55-f36e3217829c",
"agent": "05b0ac2b-89b9-422d-bb9c-5317ced0689e" // <---- add
}
}
  1. 更新其他节点的token(使用HTTP API)

给每个服务都PUT agent token,注意Header中要存放Master Token,否则不会执行成功的。

1
2
3
4
5
curl --request PUT \
--url http://10.20.61.24:8500/v1/agent/token/acl_agent_token \
--header 'Content-Type: application/json' \
--header 'X-Consul-Token: fc2047f4-6466-42e9-bf55-f36e3217829c' \
--data '{"Token": "8b63b7c1-fee3-a0e5-9537-ad981baa447e"}'

执行成功后,会返回一个空响应,但是可以查看log,是否更新成功,会有如下提示,node直接也可以正常同步信息了

1
[INFO] agent: Updated agent's ACL token "acl_agent_token"

至此,集群间正常运行!

结束!🔚


Buy Me A Coffee.